As Salesforce admins, we’re trained to rely pretty heavily on the declarative functionality available to us through the Salesforce Setup menu. But frequently we’d find it really helpful if there were quick and easy ways for viewing/manipulating raw data, comparing certain Salesforce entities or simply accessing information that we need to write things like formulae in fields or validation rules.
Whilst the Setup Menu doesn’t give us this functionality, there are tools out there that do. Let’s discuss 3 web-based tools that Salesforce Admins can use to make their lives a little easier; Workbench, The Perm Comparator & Dataloader.io. All are freely available at the following URLs:
|
Workbench |
|
|
PermComparator |
|
|
Dataloader.io |
All three tools are connecting to Salesforce over the API which means that you’ll have to login to your org through the tool using your normal credentials. It also means that you’ll have to have the ‘API Enabled’ permission in your Profile. If you’re an Admin, don’t worry about it; it’s switched on as standard.
Ok, so let’s talk about Workbench first.
Salesforce Workbench
Workbench was acquired by Salesforce a while ago and brings together a variety of really useful capabilities in a single tool. One that I find really useful is the amount of Salesforce entity information that I can access. The available tools are listed in the header bar at the top of the page.

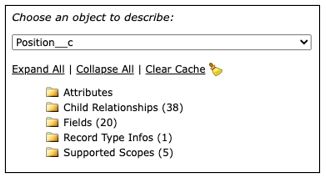
Let’s say I want to find information about a Custom Object. I’ll click on the ‘Info’ menu and select ‘Standard and Custom Objects’. I’m then prompted to choose an object to describe. In this case I’m going to select a custom object called Position__c. As soon as I make the selection, the page refreshes with categories of information types shown as individual folders.
The Attributes folder contains metadata about the object such as whether I have permissions to create records in it (createable: = true), its label and api name, and the URLs to its record detail/edit/new pages.
In the Child Relationships folder, I’ll find information about every object that is a child of this one, including system objects like Sharing objects, such as the api name of the child object, the name of the relationship field on the child and the name of the relationship from Parent to Child; which I might then want to use in a relationship query.
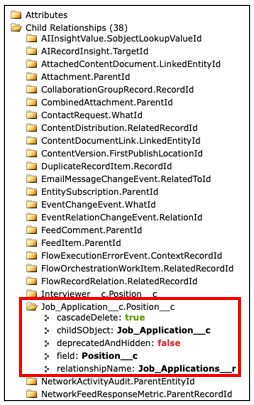
In the screenshot above, I’m looking at information about a related child object called Job_Application__c. I can see that it has a relationship field called Position__c and I can derive that it must be a Master/Detail relationship since the cascadeDelete property is true. If I wanted to write a SOQL relations query that selected Position records with all their related child Job Applications, I’d have to use the relationshipName ‘Job_Applications__r’ in my query.
As its name implies, the ‘Fields’ folder contains metadata information about the fields on the object; both Standard and Custom.
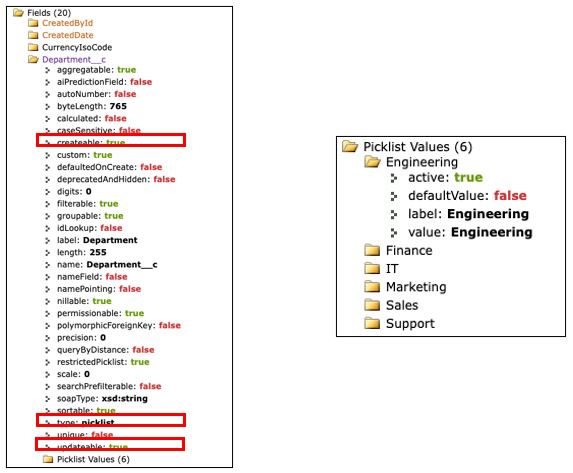
In this case I’m interrogating a custom field called Department__c. I can see that it’s a picklist, that my Field Level Security settings allow me to see it (createable: true) and edit it (updateable: true) and I can even see the picklist values and their metadata details (in the ‘Picklist Values’ sub-folder).
The ‘Record Type Infos’ folder is useful if I want to find the ID of a Record Type or its developer name.
The ‘Supported Scope’ folder isn’t one that I’ve ever needed to use, but if I ever wanted to know information about the standard ‘Show Me’ filters for this object in the Report Builder, this is where I’ll find it.
So, what other useful information can I find in Workbench? Well, let’s say I need to know how many Validation Rules I have in my org, or for a specific object. From the menu bar, I’d select ‘Metadata Types & Components’ and choose ‘ValidationRule’ in the ‘Choose a metadata type describe and list its components’ picklist.

In the above example, I can see that I have a total of just 3 Validation Rules in my org, on the Account, Campaign and Order objects. Drilling down into the Account object shows me the Validation Rule’s name and its Id along with info about its creation and last modification.
If I want to know information about my Profile or Role, the Organization Id etc, I can find that sort of stuff by going to the ‘Info’ menu and selecting ‘Session Information’.
Ok, so that’s enough about using Workbench to access entity metadata information. But what else can we do with this tool that might be useful to us as admins? Well, you can find a lot of good tips and tricks in this blog:
https://www.stimulusconsulting.co.uk/news/salesforce-workbench/
But I’d like to expand on what it says about querying the database.
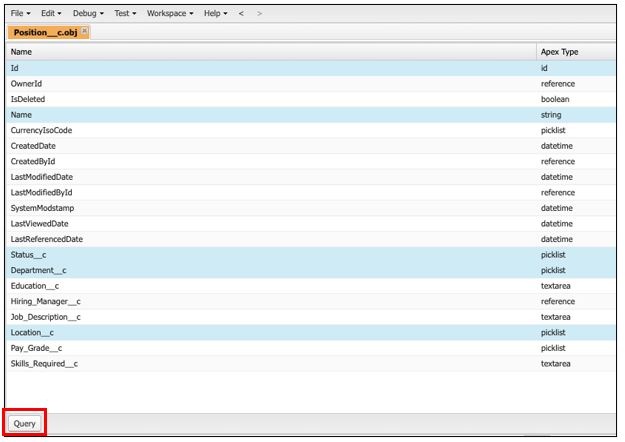
As admins, we generally work through the setup menu and the more technical amongst us may occasionally use the Developer Console to write SOQL queries and view the raw data. The Developer Console makes it easy to write queries by going to the ‘File > Open Resource’ menu item and opening the object that I’d like to query. I’m going to use the Position__c object again for my examples.
I’m presented with a list of all the object’s fields and their data types and I can use the ctrl button to select each of the fields whose data I like to see in my query results. See screenshot below:
Clicking on the ‘Query’ button in the bottom left of the pane will select the ‘Query Editor’ tab in the tabs pane at the bottom of the page (if it’s not already selected) and clicking it again will write the SOQL query for me…
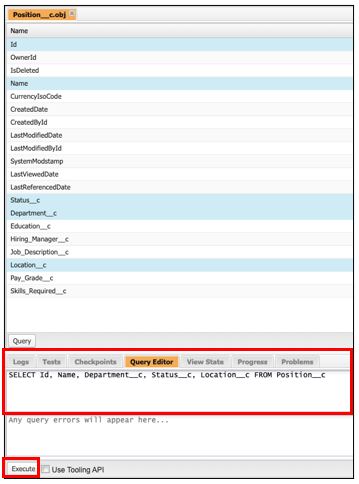
I can then edit the query as necessary and click on ‘Execute’ in the bottom left to view the query’s results in a new tab.

Now, in this example I’ve only selected 5 fields but what if I wanted all of them? Well, this is where the Developer Console fails me.
In the example below, I’ve selected ALL the fields from the Account object and as you can see, the results are utterly unhelpful!!
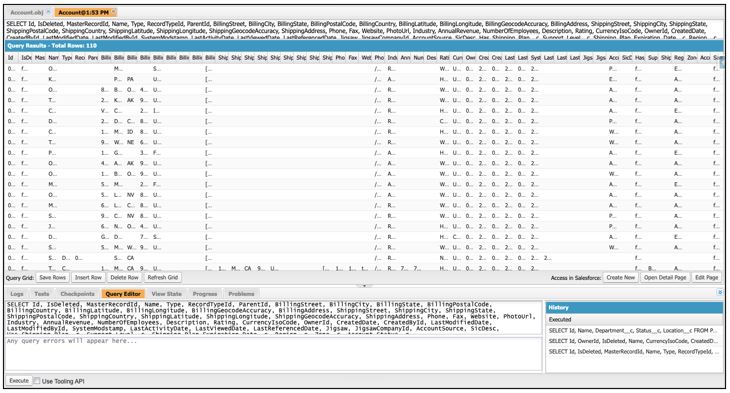
The columns are all squished up and to date, I’ve not found a way to successfully expand a column and see its contents.
Now let’s copy and paste the same query into Workbench.

From the menu, I choose ‘Queries’ and ‘SOQL Query’ and on the resulting page select the Account object in the ‘Object’ picklist. Then I paste my query into the ‘Enter or modify a SOQL query below: ‘ field and click on the ‘Query’ button.

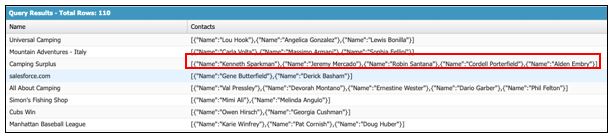
In the Developer Console, when we run relationship queries like this, where multiple child records exist for the parent, they are displayed on a single line with each child record encapsulated in a pair of curly brackets, which makes it hard to identify the individual children. Now let’s look at the same relationship query executed in Workbench…
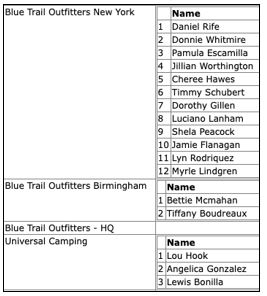
This is how I want to see my data.
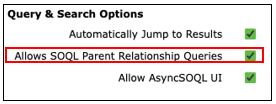
This example was a Parent to Child relationship query. If you want to be able to run Child to Parent queries in Workbench, ensure you’ve checked the ‘Allow SOQL Parent Relationship Queries’ checkbox in the Workbench Settings (click on the work ‘Workbench’ in the menu bar and choose ‘Settings’ to get there).
Workbench also allows us to perform DML Operations (all are available) from the ‘Data’ menu item. There are tools to deploy and retrieve metadata under the ‘Migration’ menu and in the ‘Utilities’ menu we’ll find a REST Explorer, an Execute Anonymous window and a tool for managing passwords (see blog https://www.stimulusconsulting.co.uk/news/salesforce-workbench/ for more information on managing passwords in Workbench).
Perm Comparator
This little-known tool was, I believe, written by a Salesforce employee and was demonstrated at Dreamforce several years ago. Considering how useful it is, I’m always surprised at how few admins know about it!
So, what does it do? Well, have you ever needed to compare Users to see how their permissions differ? Or perhaps compare Profiles to see what permissions they have in common? If you have, the PermComparator is the tool for you. In a nutshell, it allows you to compare and contrast up to 4 different Users, Profiles or Permission Sets (or for that matter, any combination thereof) and see what User Permissions, Object Permission & Setup Entity Permission they have in common, which are unique to each and which differ in each.
Once you’re logged-in to the PermComparator you’ll see a list of your Users in the left-hand pane. Click on ‘Permission Sets’ or ‘Profiles’ at the bottom to see the list of those entities in your org.

Then simply drag the entities that you’d like to compare and drop the in the ‘Drop Here’ fields at the top of the main pane.
In the example below I’m comparing two custom Profiles called Sales User & HR User and I’m looking at which Object Permissions they have in common.
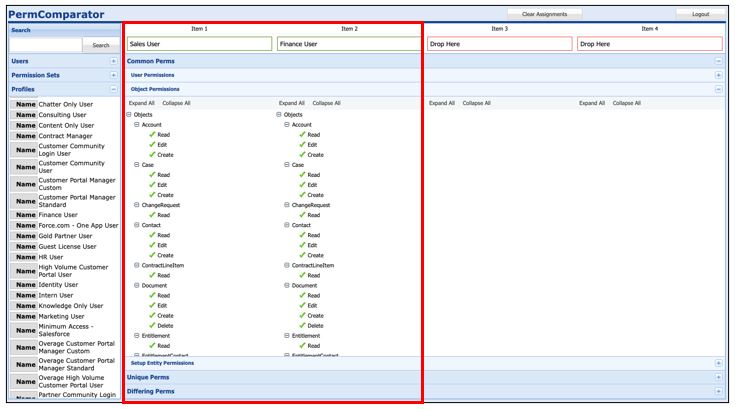
I can click on the section sliders in the main pane to see the User Permissions and Setup Entity Permissions that they have in common, or those that differ or are unique in each.
How handy is that??
Dataloader.io
The final tool that I’d like to review in this blog is Dataloader.io. This is a web based ETL (Extract, Transform, Load) tool that was recently acquired by Salesforce and as such, is fully supported by them. You’ll actually find a link to it in the Salesforce ‘Setup’ menu under ‘Integrations’.
Being a web-based tool also means that we can use it to get around some firewall issues whereas with the Force.com Apex Dataloader (which is a client application that has to be installed locally on our machines), we’d have to provide various Proxy Settings to get past the firewall.
Dataloader.io supports DML (Data Manipulation Language) commands such as Insert, Update, Upsert & Delete as well as Export.
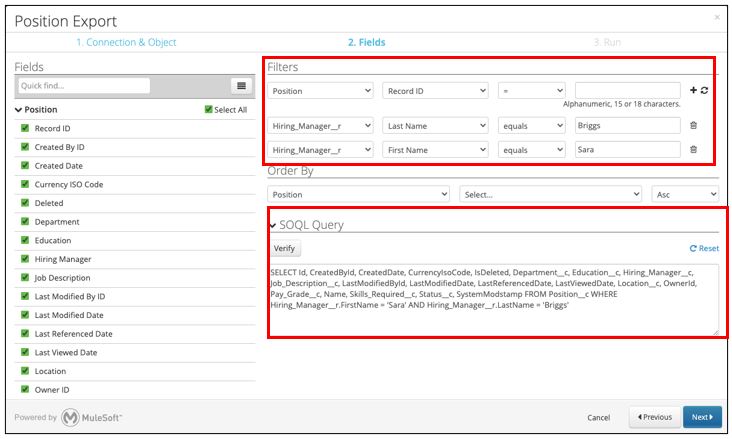
In the example below, we can see that I’m exporting all fields from the Position__c object where the Hiring Manager’s name is Sara Briggs. Notice that the tool allows me to cross the relationship from the Hiring_Manager__c field on Position__c to the related parent User record and reference the User’s Firstname and Lastname fields in the query’s filter criteria. All done with a simple point and click interface; no need to know the actual query syntax, although since the tool actually writes the SOQL query and displays it as you go, it’s a great way of learning how to write queries manually.
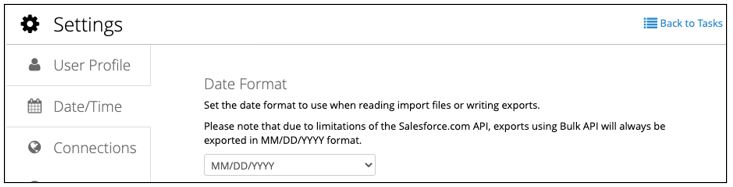
We can even control the Date Format when importing or exporting data by going to ‘Settings’ under the User Menu  in the top-right hand corner.
Import & Export files will always be in .csv format and when we’re exporting, we can choose to send the file to a designated export folder either locally or over FTP, Dropbox or Box. Sending over Secure FTP is possible but requires you to have an Enterprise Ed. Licence and isn’t available in the free version. Similarly, DataLoader.io supports scheduled data operations, but not in the free version.
When Upserting data, the tool supports what’s known as an ‘Upsert with Relationships’. This is used a lot when working with data from legacy systems.
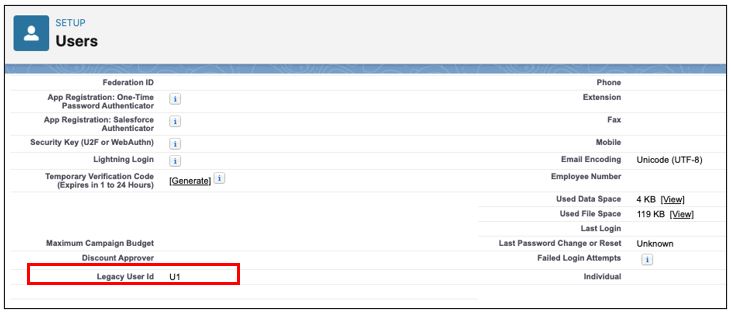
In this example, I’m upserting some Position records that I’ve exported from an old system. In that old system the Hiring Manager field on the Position record referenced Users with their Id in that system (Ids such as U1, U2, U3 etc). However, when the Position records are created in Salesforce, the Hiring Manager relationship needs the Force.com Record Id of the relevant User in Salesforce (the 18-character User Id).
Without this functionality, I’d have to export the User records from Salesforce and then use something like a VLookup in Excel to find the relevant Salesforce User Ids and bring them into my import file, so that when I perform the import I can map them to the Hiring Manager field.
With the Upsert With Relationships functionality, life is made so much easier! I’ve created an ExternalId field called ‘Legacy User Id’ on the User object and have populated the relevant user records with their Id from the old system.
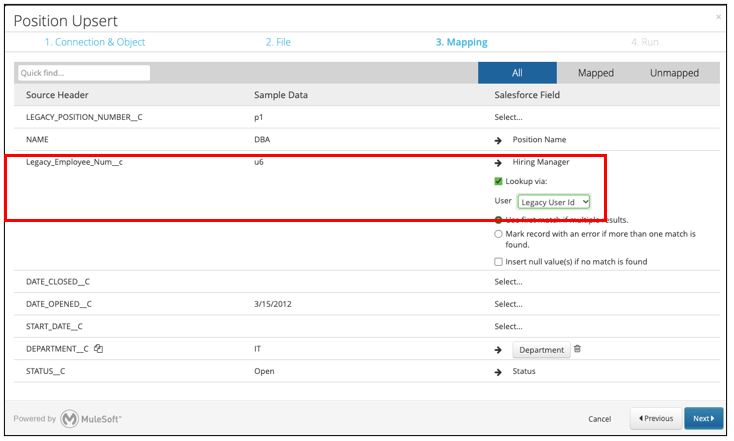
When creating my Upsert in Dataloader.io and performing the field mappings, I’m able to map the Legacy Employee Number field in my import file to the Hiring_Manager__c field on the Position object and tell it to look up the value via the Legacy User Id External Id field that I created on User (see screenshot below).
When the Upsert runs the system will take the Legacy Employee Number field from the import data and use it to lookup that User record based on the Legacy User Id in the external Id field. It then discovers the Salesforce Id of that User and uses that to update the Hiring Manager field. So, I can say goodbye to all that faffing around in Excel!!
So, there you have it, a review of some of the most useful functionality in 3 free, browser-based tools. I hope you find them as helpful and timesaving when building your apps as I have.
For more help or information, contact us!